| Main page Graphics Photography Music & Audio Audio Plugins Video Tools Web Design Documents Space Astro Amiga Funny Surreal Links & Contact |
What Went Wrong?This is an attempt to show some of the common problems you may bump into when taking pictures. I'll try to simply show examples of certain typical problems, and then explain what the cause was, so that maybe you'll be able to compare this to your own findings, and figure out why your photos didn't turn out the way they should. Often, the problems are fairly easy to recognize. The next time you take pictures, you might even recognize these problems right away, and thus be able to avoid them. All the images you see here are useless. They cannot be properly restored in software without significant loss in quality. If convenience is your top priority, this might not be the tips you're looking for, and you might as well stick to the various automatic functions that the camera offers rather than trying to understand all this. In this description I'm going to talk only about the five fundamental settings that all cameras have, and I'm going to assume you're interested in learning to take better pictures. Now, in any proper camera, you can switch to a fully manual mode (usually called "M") where you can adjust all these settings directly, instead of letting the automatic functions control them for you. By setting the camera to Manual, you risk getting strange pictures in the beginning. The benefit is that you will be able to have full control, and once you understand these five parameters you will be able to use any camera of any brand!
Overexposed First some basics. Digital cameras are rather sensitive to what amount of light they're subjected to.
Once an image is overexposed like this image, you will never be able to restore the areas that have become entirely white.
Solution 1: Reduce the ISO number if you can. This will also help getting rid of any noise that may be present. If the ISO cannot go lower, try one of the other two options:
Solution 2: Close the aperture a few steps (go to a higher "F" number). This might even give you a bit of extra sharpness. Don't go too high though. If you're already at F8 or higher, go to solution 3 instead.
Solution 3: Use a faster shutter time. This will also make the image darker and even reduce any shaking or unwanted movement.
First some basics. Digital cameras are rather sensitive to what amount of light they're subjected to.
Once an image is overexposed like this image, you will never be able to restore the areas that have become entirely white.
Solution 1: Reduce the ISO number if you can. This will also help getting rid of any noise that may be present. If the ISO cannot go lower, try one of the other two options:
Solution 2: Close the aperture a few steps (go to a higher "F" number). This might even give you a bit of extra sharpness. Don't go too high though. If you're already at F8 or higher, go to solution 3 instead.
Solution 3: Use a faster shutter time. This will also make the image darker and even reduce any shaking or unwanted movement.
Underexposed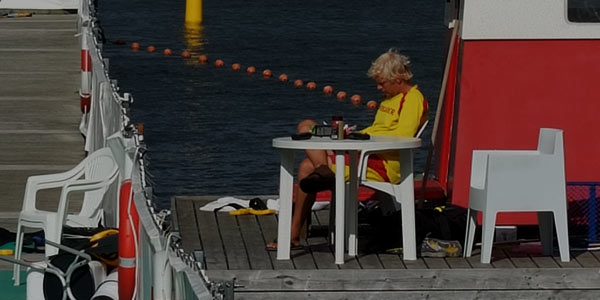 Now this might be the only image on this page that could be rescued in software, but it is still better to make it right from the beginning. You need to let in more light, and if you're not certain how much more light is right, take a look at the histogram which is often more accurate than using the screen on the camera.
Solution 1: Use a slower shutter time. This will make the image brighter, but the risk of shaking the camera is now much greater. If this is a problem, go to solution 2.
Solution 2: Open up the aperture a few steps (go to a lower "F" number). This might even give you a bit less sharpness, but you might enjoy the nice out-of-focus effect of a blurry background or foreground. Don't go low high though, or you might start loosing too much sharpness (which can happen because of several reasons).
Solution 3: Increase the ISO number. This way you'll get more light without having to use horribly slow shutter times or opening up the aperture. The down-side is that you get more noise.
Now this might be the only image on this page that could be rescued in software, but it is still better to make it right from the beginning. You need to let in more light, and if you're not certain how much more light is right, take a look at the histogram which is often more accurate than using the screen on the camera.
Solution 1: Use a slower shutter time. This will make the image brighter, but the risk of shaking the camera is now much greater. If this is a problem, go to solution 2.
Solution 2: Open up the aperture a few steps (go to a lower "F" number). This might even give you a bit less sharpness, but you might enjoy the nice out-of-focus effect of a blurry background or foreground. Don't go low high though, or you might start loosing too much sharpness (which can happen because of several reasons).
Solution 3: Increase the ISO number. This way you'll get more light without having to use horribly slow shutter times or opening up the aperture. The down-side is that you get more noise.
Shaky Image Notice how the blur seems to be "pointing" in one direction.
This is because the camera was moving while the image was taken.
Solution 1: Use a faster shutter time.
Solution 2: Use a tripod or any other means to stabilize the camera.
Notice how the blur seems to be "pointing" in one direction.
This is because the camera was moving while the image was taken.
Solution 1: Use a faster shutter time.
Solution 2: Use a tripod or any other means to stabilize the camera.
Blurry Image Notice how the blur is not "pointing" in one direction like the above image, but is just generally blurry.
You simply didn't focus precisely enough.
Solution 1: Try taking several pictures. Auto-focus doesn't always hit the spot. Make sure you understand which point(s) the autofocus uses when making its decisions. Read the manual on how auto focus really works. Some modes are quite complicated and hard to predict.
Solution 2: Spend more time focusing, if you're using manual focus. Take several pictures with slightly different focus, so that you can decide which is better, when you get back home to a good screen.
Notice how the blur is not "pointing" in one direction like the above image, but is just generally blurry.
You simply didn't focus precisely enough.
Solution 1: Try taking several pictures. Auto-focus doesn't always hit the spot. Make sure you understand which point(s) the autofocus uses when making its decisions. Read the manual on how auto focus really works. Some modes are quite complicated and hard to predict.
Solution 2: Spend more time focusing, if you're using manual focus. Take several pictures with slightly different focus, so that you can decide which is better, when you get back home to a good screen.
Noisy Image Full of noise? First of all, be aware that even though this is easy to see when zooming in, it goes away quite a bit when scaling down the image.
It's a result of using a too high ISO value.
Solution 1: Decrease the ISO value and use a longer exposure time to compensate for the loss of light, if movement is not a problem.
Solution 2: Decrease the ISO value and use a more open aperture if your lens can do that (kit lenses are rather limited in this regard.)
Full of noise? First of all, be aware that even though this is easy to see when zooming in, it goes away quite a bit when scaling down the image.
It's a result of using a too high ISO value.
Solution 1: Decrease the ISO value and use a longer exposure time to compensate for the loss of light, if movement is not a problem.
Solution 2: Decrease the ISO value and use a more open aperture if your lens can do that (kit lenses are rather limited in this regard.)
Yellow or Blue Cast
 All digital cameras have a white balance setting (sometimes just called "WB"). The most commonly used ones are the "sun" icon (for out-door use) or the "bulb" icon (for indoor use).
Notice that certain kinds of artificial light (industrial sodium vapor lamp, neon lamps etc.) have so odd colors that your images will always look bad. Switch to black/white or avoid these entirely.
Solution 1: Adjust the WB to the icon that corresponds to your current conditions. Don't rely too much on auto white balance. It often makes mistakes.
Solution 2: Have a white piece of paper ready and shoot a "custom white balance" to fit the current light conditions. Refer to the camera's manual on how to do this. This technique is usually very precise, but if you move to a different location with different light, you have to shoot a new white balance.
Solution 3: Shoot raw format and fix the white balance in software later on.
All digital cameras have a white balance setting (sometimes just called "WB"). The most commonly used ones are the "sun" icon (for out-door use) or the "bulb" icon (for indoor use).
Notice that certain kinds of artificial light (industrial sodium vapor lamp, neon lamps etc.) have so odd colors that your images will always look bad. Switch to black/white or avoid these entirely.
Solution 1: Adjust the WB to the icon that corresponds to your current conditions. Don't rely too much on auto white balance. It often makes mistakes.
Solution 2: Have a white piece of paper ready and shoot a "custom white balance" to fit the current light conditions. Refer to the camera's manual on how to do this. This technique is usually very precise, but if you move to a different location with different light, you have to shoot a new white balance.
Solution 3: Shoot raw format and fix the white balance in software later on.
Weird Glow Around Highlights Are you seeing a strange red or blue-violet glow around highlights? This is often a result of opening the aperture up too much (using a too low "F" number).
The problem is especially bad with low-light lenses (F1.2, F1.4, F1.8 and such) or cheap lenses.
Solution: Close the aperture a few "clicks". This will let in less light, so you'll have to compensate either by using longer exposure times or a higher ISO value (see above to know what problems to look for, if you go too far)
Are you seeing a strange red or blue-violet glow around highlights? This is often a result of opening the aperture up too much (using a too low "F" number).
The problem is especially bad with low-light lenses (F1.2, F1.4, F1.8 and such) or cheap lenses.
Solution: Close the aperture a few "clicks". This will let in less light, so you'll have to compensate either by using longer exposure times or a higher ISO value (see above to know what problems to look for, if you go too far)
Fuzzy Soft Appearance Is everything a bit fuzzy even though you know the image is in perfect focus? Do you feel the image lacks a bit of contrast? Maybe you're simply using a too small aperture, such as F16 or higher.
This may seem counter-intuitive, but many optics start becoming less sharp when you approach such aperture extreme values, due to a concept called "diffraction".
Solution: Open up the the aperture several steps. Many lenses are best around the middle of their aperture scale, so if you have a range from F2.8 to F16 a good guess would be somewhere around F5.6 for maximum sharpness.
Is everything a bit fuzzy even though you know the image is in perfect focus? Do you feel the image lacks a bit of contrast? Maybe you're simply using a too small aperture, such as F16 or higher.
This may seem counter-intuitive, but many optics start becoming less sharp when you approach such aperture extreme values, due to a concept called "diffraction".
Solution: Open up the the aperture several steps. Many lenses are best around the middle of their aperture scale, so if you have a range from F2.8 to F16 a good guess would be somewhere around F5.6 for maximum sharpness.
The Original ImageIn case you were curious...  Website by Joachim Michaelis
|