| Main page Graphics Photography Music & Audio Audio Plugins Video Tools Web Design Documents Space Astro Amiga Funny Surreal Links & Contact |
Stable DiffusionThis summary is based on my own experimentation with Automatic1111's WebUI, winter 2023. My discoveries will probably match other variations of Stable Diffusion and perhaps also MidJourney and Dall-E to some degree. I won't include an installation guide, as that would probably become obsolete before I'm even done writing. In fact this whole page is probably already obsolete by the time you read this. So here goes nothing... Checkpoint / ModelThis is the "brain" – basically the complete memory (training data set) of the robot. There are different models to choose from. A model is a rather large file, typically between 2 and 7 gigabytes. The originals are: Stable Diffusion 1.4, 1.5, 2.0 and 2.1. You can get good results using these, but it's also possible to get customized and finetuned versions such as "Protogen" or "Deliberate" which make it a lot easier to get good results, so i highly recommend also getting a few of those. Most of the modified versions are based on Stable Diffusion 1.5 which seems to give slightly better results than 2.0 and 2.1 for some reason.PromptsThere are two kinds of prompts: Positive and negative. Describe what you want the bot to create in the first prompt. If something appears which you don't like, describe that in the negative prompt (the other text field). Generally use short sentences separated by either commas or punctuation marks. This works a bit better than long sentences. The stuff you type should match the image descriptions used while training the robot, so there's a lot of guessing involved. It seems to me that MidJourney is better at dealing with long sentences, whereas Stable Diffusion prefers things broken up like this: "close-up portrait, an old man on a bench, gray trenchcoat, black hat".What works:
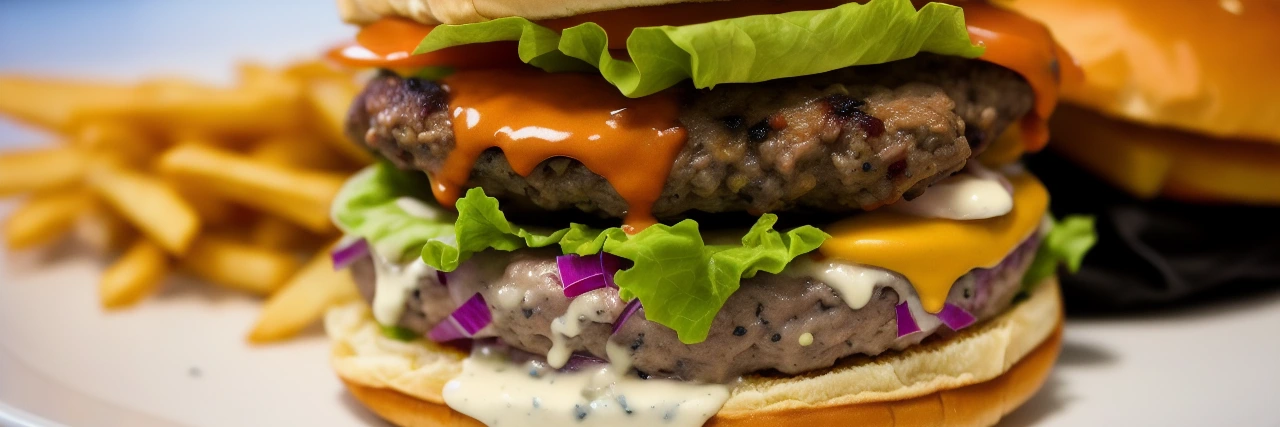 Positive prompt: "masterpiece, best quality, close-up photo of a tasty burger, served on a plate, in the background a restaurant"
Negative prompt: "lowres, text, error, cropped, worst quality, low quality, normal quality, jpeg artifacts, signature, watermark, username, blurry, artist name"
Model / checkpoint: "Protogen 8.0", 30 euler samples, CFG 7.
Positive prompt: "masterpiece, best quality, close-up photo of a tasty burger, served on a plate, in the background a restaurant"
Negative prompt: "lowres, text, error, cropped, worst quality, low quality, normal quality, jpeg artifacts, signature, watermark, username, blurry, artist name"
Model / checkpoint: "Protogen 8.0", 30 euler samples, CFG 7.
Main SettingsSampling Method: Just use "Euler" instead of "Euler a". It's gonna get the job done in 99% of all cases, and is easier to work with because it doesn't change too much if you decide to increase the number of samples.Sampling Steps: For photo realistic images 30-50 should do the trick. For anime 20-30 will suffice. If you feel you need to go above this, you should probably be fixing something else instead. Width & Height: Stable Diffusion 1.x is trained on 512 x 512 images. If you have problems getting good results, use 512 x 512. If you want to go higher, keep one side 512 and only increase on the other axis. And don't go beyond appx. 768 pixels or so, or you'll start getting odd repetitions. Batch Count: How many images to generate. Does not use extra resources. Batch Size: How many images to generate simultaneously. This may make your graphics card run out of memory. CFG Scale: Decides how much you want to force your text into effect. Too high values will yield unnatural results. Useful range is 7 - 9, but for anime you may have to go as high as 12. This also depends on the checkpoint / model. Seed: If you're making small adjustments to your prompt or other settings, I recommend typing in some random number, e.g. "100" to lock the randomization in place. This way you know that when the image changes, it's because of your changes only. The value -1 will make it randomize every time you click Generate. Restore Faces: This enables face restoration which can be controlled in the Settings tab. It works well for photorealism, but not for anime. Tiling: Useful feature for people who need to make tilable images such as 3D graphic artists. Hires Fix: This is one of many ways to break free of the 512 pixel limit. I recommend using the "4x-UltraSharp" upscaler and a denoisning strength between 0.6 and 0.7. The upscale factor will depend on your amount of graphics card ram. Clip Skip: This setting is placed on the Settings page. It skips a "layer" of the robot's brain. The normal value is 1. Some specific models are trained with a different value, in which case you should use the same value. For example "Noval AI" needs clip skip = 2. Upscaling WorkflowBreaking the 512 pixel barrier is where this tool becomes useful. This is however also the hard part. Currently there are multiple ways to upscale:
Additional ConceptsThere are ways to tweak the results in a certain direction. For example if you want a certain art style, or want to generate images of your favorite movie actor, you may want to obtain one of these kind of files:Embedding: These are rather small files that nudge the model in a certain direction. They work best if you're using the same model or at least a model that is similar to the one used when creating the embedding. Lora: These are slightly larger files that nudge the robot in a certain direction. This appears to be a newer technology that does the same as an embedding, though a bit more efficiently as far as I can tell. As with embeddings, I believe that these work better if you use them with a model similar to the one they were designed for. Lycoris / Locon / Loha: These appear to be even newer technologies that do the same as a Lora or an embedding. Weird names? Yup, I think so too. VAE: Basically a helper file for the model which adjusts colors, contrast and to a lesser degree details. Pickle: A file format used by Python developers which can contain both data and code, which means it is a potential safety hazard. The new format ".safetensor" fixes this problem. Always choose .safetensors over .ckpt files when possible. ControlNet: An extension for Stable Diffusion which gives you more control over the placement of things in the images. It's a bit technical but very useful. Ethical ConsiderationsThe whole dataset was acquired in a way that graphics artists and photographers did approve of once they realized the scope of the project. For example, it is possible to create rather life-like imitations of many artist's styles, which I don't recommend doing. Considering that the technology is available to everyone, it is now up people using the tool to behave responsibly and be respectful to the original artists.Website by Joachim Michaelis
|